

Templates Guides
HVAC Rough-In Checklist: Stay Code-Compliant & Efficient
 HVAC
HVAC
October 1st, 2026
ServiceTitan


A rough-in checklist is a structured list of installation tasks that HVAC technicians complete before walls are closed and finished surfaces go in. It covers everything from ductwork routing and equipment placement to refrigerant lines, condensate drains, electrical connections, and venting.
Essentially, it includes all the behind-the-scenes work that must happen before a building inspector sets foot on the job site.
For HVAC contractors, skipping or rushing this step is expensive. A failed rough-in inspection means rework, project delays, and, in many cases, withheld payments until the HVAC system is brought up to code.
When you're running multiple crews across multiple jobs, one overlooked item can throw off an entire project timeline.
This guide gives you a complete, phase-by-phase HVAC rough-in checklist that you can put to use immediately.
You'll learn what to verify before work begins, how to move through each installation phase systematically, and what common mistakes to watch for, so your jobs pass inspection the first time, every time.
How to Use the Rough-in Checklist Template
To use the template provided on this page, follow the steps below:
Step 1: Download and review the checklist before the job starts. Share it with your lead installer or field supervisor so everyone knows what's expected before work begins.
Step 2: Work through each phase in order. The checklist is organized by installation phase (e.g., ducting, equipment placement, and so on) to match the natural rough-in sequence.
Step 3: Check off each item once complete. If a task can't be completed or needs a second look, flag it with a note so it doesn't get buried.
Step 4: Review the completed checklist before calling for inspection. Use it as your final confirmation that the job is ready.
With the template in hand, here's why making it a standard part of every job matters.
The #1 newsletter for the trades.
Why a Rough-In Checklist Is Important for HVAC Contractors
Rough-in work happens fast, often under pressure from general contractors and tight project schedules. Without a structured process, even experienced technicians miss steps, and in air conditioning and heating installations, a missed step rarely stays hidden for long.
A rough-in checklist turns that process from something that relies on memory and habit into something controlled and repeatable, no matter which crew is on the job.
Here's what's at stake if you skip it:
Failed inspections: Missing a single building code requirement (like wrong duct clearance, unsupported refrigerant lines, or improper venting) means the inspector doesn't sign off and the job stalls.
Rework costs: Opening up walls or ceilings after rough-in to fix installation errors is time-consuming and cuts directly into your margins.
GC disputes: When your work holds up other trades, it damages the relationship with the general contractor (GC) and your standing on future projects.
Project delays: A failed inspection pushes back the entire construction timeline, not just your portion of the job.
Reputation damage: Repeat inspection failures overshadow a company’s reputation. In a relationship-driven industry, that's hard to overcome.
Used consistently, an inspection checklist is one of the simplest ways to protect your business on every job. Next, let’s look at when it’s best to use one.
When to Use a Rough-In Checklist
A rough-in checklist isn't something you run through just before calling the inspector. To get the most out of it, use it at three distinct stages of each job.
1. During planning, before work begins
Before your crew sets foot on the job site, use the checklist to scope materials, confirm equipment specifications, and map out the installation sequence. Reviewing each phase in advance helps you identify potential conflicts early.
For example, a duct run that crosses a structural beam, a condensate drain that needs an unconventional route, or equipment clearances that don't match the architectural drawings. Catching these on paper is cheaper than catching them mid-installation.
2. During installation, as a live reference
The checklist should be accessible to your lead technician throughout the rough-in. As each phase is completed, techs work through the corresponding section and confirm each item before moving on.
This keeps the job moving and prevents the common pitfall of mentally signing off on a stage before resolving an important detail. It also creates a clear handoff point in case a second crew takes over mid-job.
3. Before calling for inspection, as a final self-audit
Once installation is complete, run through the checklist one more time before contacting the inspector. If you're working on a commercial project, you can also refer to our commercial maintenance checklist.
This is your last opportunity to catch anything that was missed, document that the work is code-compliant, and go into the inspection with peace of mind.
Pre-Rough-In: Permits, Plans, and Documentation
Getting the paperwork and coordination in order before work begins is just as important as the installation itself.
Confirm each of the following before your crew starts work:
Permit and approved plans are on site: All documents must be physically present and accessible to the inspector at the time of inspection. This is a code requirement in most jurisdictions, and showing up without them is grounds for an immediate failed inspection.
Permit information is accurate: Verify that the permit reflects the correct job site address, scope of work, and permit number. Discrepancies between the permit and the approved plans can raise flags during inspection even when the installation itself is correct.
Duct rough-in test affidavit is prepared: In jurisdictions that require duct leakage testing, have the affidavit ready before rough-in begins so testing can be completed and documented without holding up the inspection.
Load calculations have been reviewed: Confirm that the equipment being installed matches the load calculations on the approved plans. Installing oversized or undersized equipment at this stage creates compliance issues that are costly to correct later.
Equipment dimensions are verified against the plan: Check that physical clearances for the units being installed align with what's shown on the drawings, including the service access space.
Coordination with electrical and plumbing trades is confirmed: Identify any areas where your work intersects with other trades and agree on sequencing before rough-in starts, to avoid conflicts mid-job.
With permits verified, plans confirmed, and trades aligned, your crew is ready to move through the installation.
HVAC Rough-In Checklist: Phase-by-Phase
With pre-rough-in documentation confirmed, work through each installation phase in order.
Each section below covers the key items to verify before moving to the next phase.


1. Ductwork installation
Ductwork is typically the first phase and sets the foundation for everything that follows. Verify the following:
Duct sizing matches the approved plans and load calculations.
All ducts are properly supported at required intervals per local code.
Joints are sealed with mastic or UL-listed tape, not standard duct tape.
Supply and return air locations match the approved layout.
Ductwork is clear of high-moisture areas, including crawl spaces, and maintains required clearances from combustibles.
Flex duct runs are fully extended with no kinks or excess length.
2. Equipment placement and support
Improperly positioned or supported equipment will create problems during inspection and throughout the system's lifespan. Check that:
The unit is installed in the location shown on the approved plans.
Minimum clearances on all sides meet manufacturer specifications and code requirements.
Equipment is level and properly secured to its platform, pad, or mounting surface.
Vibration isolation is in place where required.
Service access clearances are maintained on all sides.
3. Refrigerant lines, gas lines, and condensate drain
Both refrigerant lines and condensate drains are closely reviewed during inspection and are common sources of failed inspections. To avoid this, ensure the following are taken care of:
Gas lines and gas piping are pressure tested, properly supported, and routed away from ignition sources.
Gas meter location is confirmed, and service line routing is coordinated with the utility.
A shut-off valve is installed and accessible at the equipment connection point.
Refrigerant lines are properly sized per equipment specifications.
Lines are supported at required intervals and protected where they pass through framing.
Line set insulation is intact and continuous, with no gaps at fittings to prevent condensation and corrosion.
Condensate drain is correctly sloped toward the discharge point.
A secondary drain pan and drain line are installed where required.
Condensate drain terminates at an approved location.
4. Electrical rough-in
Electrical work at this stage is limited to rough-in only, but it needs to be correct before walls close, with all these details taken care of:
Disconnect is located within sight of the equipment and meets required clearances.
Wiring is the correct gauge for the equipment load.
Conduit and wiring are properly secured and protected through framing.
Breaker sizing matches the equipment load and is confirmed with the electrical trade.
Low-voltage wiring is run and labeled.
All electrical rough-in work meets local code and equipment manufacturer requirements.
5. Thermostat and controls rough-in
Control wiring is easy to overlook during rough-in but the following requirements should be confirmed before walls close:
Thermostat wiring is run to the correct location per the approved plans.
Vent terminations are correctly located away from windows, doors, and any air inlet or intake.
Control wiring is protected where it passes through framing.
The thermostat location avoids direct sunlight, drafts, and heat sources.
Any zoning controls or damper actuator wiring is roughed in and accessible.
Low-voltage wiring is labeled at both ends.
Exhaust fans are correctly sized, ducted, and terminated to the exterior per code to ensure optimal indoor air quality.
6. Venting and combustion air
Improper venting is one of the most serious inspection failures for gas equipment. Make sure it never happens on your watch by attending to these details beforehand:
The flue vent is correctly sized and pitched per manufacturer specifications.
Vent clearances from combustibles and openings meet code requirements.
The combustion air supply is adequate for the equipment installed.
All vent joints are properly connected and secured.
High-efficiency equipment PVC venting is supported and terminated correctly.
7. Inspection readiness
Before calling for inspection, do a final check of each phase above and confirm:
All rough-in work is visible and accessible to the inspector.
Equipment like smoke detectors and air handlers is placed appropriately for local code compliance.
Permit and approved plans are on site.
Any required affidavits or test documentation are complete.
Nothing has been covered or enclosed prematurely.
Working through each phase systematically gets the job ready for final inspection.
The next step is knowing which mistakes most often derail that process.
6 Common HVAC Rough-In Mistakes to Avoid
Even experienced crews make rough-in mistakes when jobs move fast, and oversight is limited.
These are the ones that show up most often and cost the most to fix:
Mistake #1: Improper ductwork sealing and sizing. Undersized ducts restrict airflow and force equipment to work harder. Unsealed joints leak conditioned air into unconditioned spaces. Both issues drive up energy consumption, reduce energy efficiency, and create uneven distribution that homeowners notice immediately.
Mistake #2: Skipping combustion air calculations. Units installed in tight mechanical rooms without adequate combustion air will underperform and create safety hazards. This straightforward calculation often gets skipped under time pressure.
Mistake #3: Equipment placed in inaccessible locations. A unit that can't be serviced without removing the surrounding structure will fail inspection in many jurisdictions and create costly callbacks throughout its lifespan.
Mistake #4: Missing condensate trap or overflow pan. A missing trap allows air to bypass the drain, and a missing overflow pan leaves the building vulnerable to water damage.
Mistake #5: Disconnect location not coordinated with the electrical trade. Finding out at inspection that the disconnect is in the wrong location or is blocked by another trade's work is an avoidable delay.
Mistake #6: Poor documentation of concealed work. No photos of rough-in before walls close, incomplete checklists, and missing sign-offs create disputes with general contractors and can delay payment.
To avoid these pitfalls, train your crew to complete the inspection checklist consistently on every job.
How to Ensure Your Crew Follows the Checklist on Every Job
A checklist only works if your crew uses it consistently. For most HVAC contractors, the problem isn’t knowing what to check; it's having a reliable system to make sure nothing gets missed.
ServiceTitan connects your checklists directly to your workflow, from scheduling and dispatch to job completion, so technicians can stay aligned and collaborate efficiently.
Forms and checklists
ServiceTitan's custom forms and checklists feature lets you build a rough-in checklist and automatically attach it to every relevant job type.
When a new construction or retrofit installation job is created in the system, the checklist triggers and is assigned to the job record without manual admin.

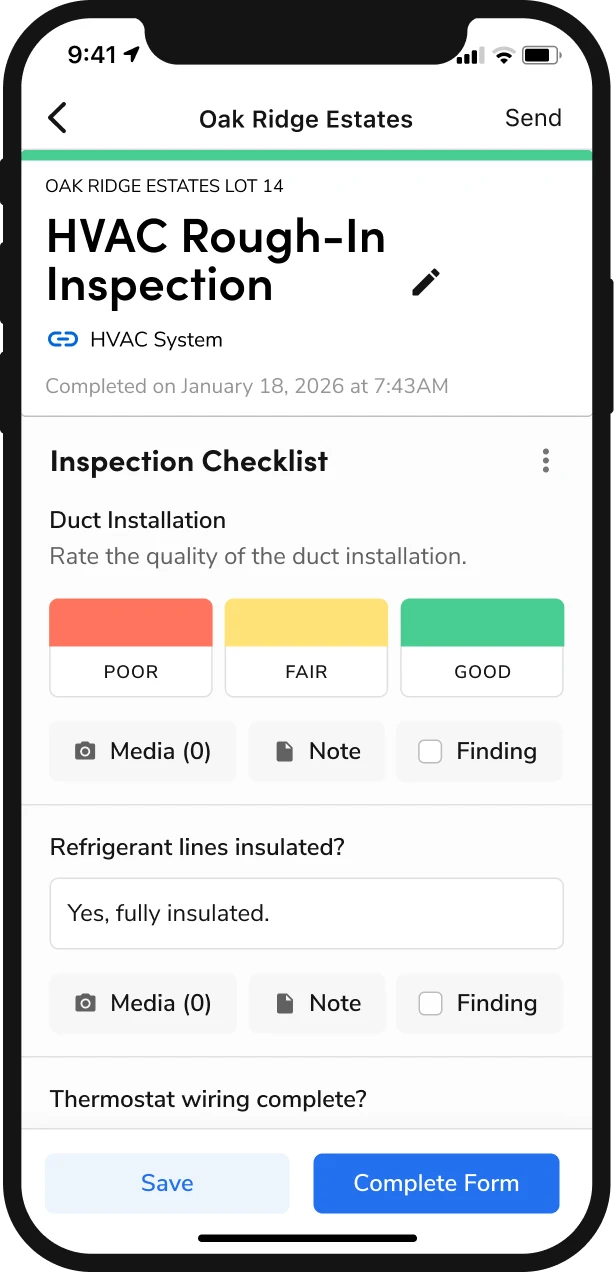
Through the Field Mobile App, technicians work through the checklist on site directly from their phone or tablet. Each item can be checked off as it's completed, and techs can attach photos and annotations to specific line items to document their work.
Plus, the Field Mobile App works in low-connectivity environments, so technicians can keep working through the checklist even in basements or mechanical rooms with poor signal. Completed items and photos sync automatically once the connection is restored.
Scheduling and dispatching
ServiceTitan's scheduling software lets you assign jobs based on technician certifications, availability, and location, ensuring the crew that shows up is qualified for that specific job type.


When you dispatch a job, the assigned technician receives the job details, approved plans, and attached checklist through the app.
This eliminates the need for extra communication or paperwork, as well as the risk of a technician starting work without the right documentation.
Estimation
When a checklist item gets flagged during rough-in, it often means additional materials or work is needed. ServiceTitan's estimation feature includes good-better-best pricing tiers linked to flagged checklist items, so technicians can generate and present on-site options to the customer.


This keeps the job moving instead of waiting for someone in the office to put together a change order, and it creates a documented paper trail that connects the flagged item to the additional work approved.
Real-time reporting
ServiceTitan's reporting gives field service managers visibility into checklist completion rates across jobs, technicians, and job types.
If a particular phase is skipped regularly or a specific technician consistently misses items, you can spot that pattern before it turns into failed rough-in inspections.
Combined with the CRM, every completed checklist, photo, and form becomes part of the customer and job history. This allows you to keep a record that supports warranty claims, dispute resolution, and future service visits.
If you want to see how ServiceTitan can help your HVAC business standardize rough-in quality across jobs, get in touch with our team.
Over to You
A rough-in checklist is one of the simplest ways to protect your jobs from failed inspections, rework, and project delays. Use the template in this guide as your starting point, adapt it to your local code requirements, and make it a standard part of every job your crew runs.
ServiceTitan is a field service management platform built for home service businesses. From scheduling and dispatch to checklists, reporting, and customer management, it gives contractors the tools to run cleaner HVAC system installations and grow their business. Learn more about ServiceTitan.


